|
Current inkjet printers are capable of delivering excellent results. The magazine article explains many of the tricks and tips for getting the best possible results.
Test Print
A worthwhile way of saving paper and ink is to re-use the same sheet of paper for test prints. A ‘raw’ test print in Photoshop format is available here for download. There are two variations depending on the colour space you use, either sRGB or AdobeRGB 1998. Which one you use depends on how you have set up Photoshop or similar image editing program. If your default colour space is sRGB choose the sRGB version, and similarly for AdobeRGB 1998. In Photoshop Elements a setting of ‘Limited Color Management’ actually uses sRGB colour space, so choose this test print. The ‘Full color management’ setting uses AdobeRGB 1998 colour space. If you don’t know which one to use, choose sRGB since this is the colour space used by all digital cameras unless you change the camera settings.
Printer Settings
There are many different printer models available on the market. The author uses an Epson R800 which produces excellent prints Unfortunately the instructions are not particularly helpful on how to configure it for the best results. Below is a screenshot of the Printing Preferences. These show how to use the printer with Epson standard inks and Epson Premium Glossy photo paper.
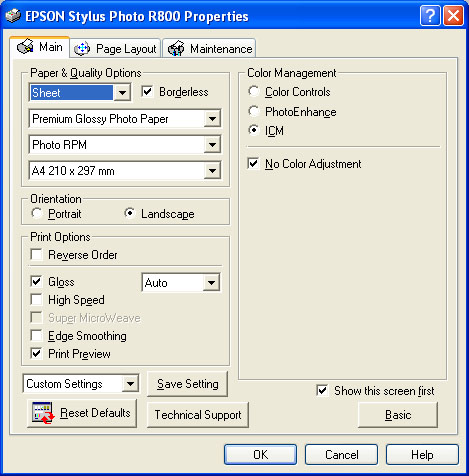
You should download the ICC colour profile corresponding to your paper tape from the Epson USA web site here and load them on to your PC or Macintosh.
Photoshop Elements
When printing from Photoshop Elements (version 2 in this example) choose the ‘Print Preview...’ option. You may need to select ‘Show more options’ and you will then get something like the following screen:

Use the drop down box to choose ‘Color Management’. Provided you have loaded the new profiles correctly you should then be able to choose one for the ‘Profile’option in the ‘Print Space’.
Full Photoshop
The corresponding screen for full Photoshop (version CS in this example) is shown below and is available from the ‘Print with Preview...’ option. Note that it is essentail to choose the correct print profile otherwise you may get poor results. The latest profiles from the Epson US web site gave good results on the author’s printer.

|


